4. Redstone

4.1. Summary
If you want to develop like the OpenStack ® [1] project, the “Redstone” blueprint is what you are after.
Learn more on the processes that are used by the OpenStack project here:
Check this tutorial which shows Redstone in action:
4.2. Tools and features
Very high level, the Redstone flow looks like this:
In its current version, the Redstone blueprint contains the following features:
Puppet master automation, create new modules and promote them in the forj-config project.
- Gerrit/git services for revision control and change management.
- Login with Launchpad openid, use www.launchpad.net to setup your email account for authentication.
- Create open commits that can be reviewed with the team and gated for change before they hit master.
- Tag and release changes when they are ready for testing or production.
- Mark commits as work in progress or abandon revert old changes.
- Create new gerrit projects and acl?s managed from source in forj-config project.
- Jenkins/Zuul integration
- Create zuul macros to automate common build task, or re-use pre-existing openstack macros included in the pre-configured forj-config project.
- Create automatic Jenkins jobs so that your team no longer manages Jenkins setup on Jenkins master, all configuration is managed as source in forj-config git project.
- Gate changes and execute automated test as soon as changes make it to gerrit/git.
- Promote changes based on gerrit events for tagging or comments made during reviews.
- Login with launchpad openid
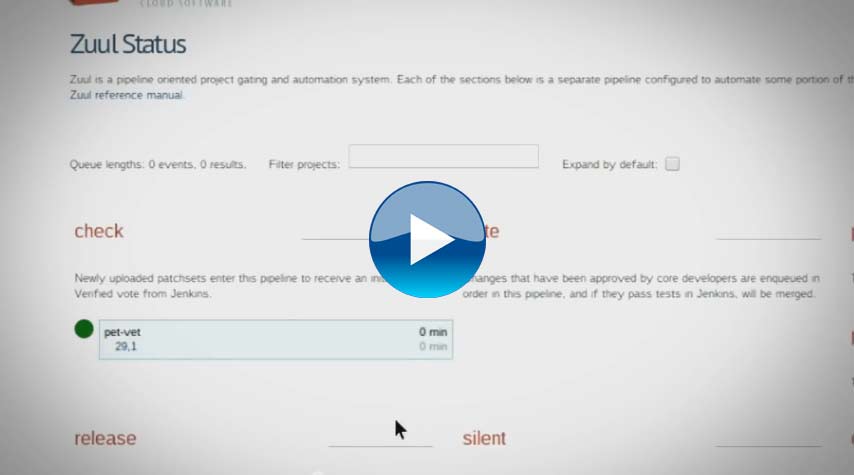
- Zuul status: see what changes are being automatically tested, the progress and the status from one interface
- Pastebin integration
- Collaborate with team mates with code snippets and log pasting for troubleshooting defects.
- Defect tracking
- Mark gerrit changes with defect id?s to link to your defect system with Launchpad or HP Agile Manager
4.3. Project Management
You can manage project using Maestro user interface, or by editing the “forj-config” GIT repository (through Gerrit).
4.3.1. Adding a new project
In the Redstone blueprint, projects are managed by code, exactly like the OpenStack infrastructure project. This code, which sits in the forj-config Gerrit repository describes a project and is used to provision the entire chain associated to a project (Gerrit, Jenkins, Zuul).
4.3.1.1. With Maestro User Interface
- Enter the maestro UI and sign-in if needed, so you become the administrator and can add projects. The first user who logs becomes administrator and can add other administrators. Only administrator can create projects.
- Connect to Gerrit. The first user who logs in to Gerrit becomes administrator
- As a Gerrit administrator, add yourself to the “forj-config” group. This allows you to review and approve changes in the forj-config project
- Go to the projects tab then add projects icon, finally set the name for you project and wait ~15 minutes until the change is propagated to gerrit (this uses Puppet mechanisms)
- Go to Gerrit and approve (+2) or reject (-2) the project creation change
- Once Puppet has done its work (up to 30 minutes), the new project is fully created and configured in Gerrit, Jenkins and Zuul
Note
You can force “Puppet Apply” and speed up the process through the Jenkins “puppet-apply-all-nodes” job, or directly in a terminal session on the Maestro / Puppet master system
4.3.1.2. Using “Redstone” mechanisms
You have full control of project creation by checking out the forj-config project and modifying the files that you need.
Note
In the “Redstone” blueprint, everything is threated as code. You must go through Gerrit mechanisms to edit project configuration. Otherwise, your changes will be dismissed the next time the puppet master runs.
- Check out the forj-config project
Each forge has its own forj-config project. Make sure your ssh keys are added to the gerrit server. To approve a change, make sure your user account is a member of the forj-core group.
- Assigning someone to be a verifier for forj-config project
When there is no jenkins/zuul functionality on the forj-config project, it’s sometimes necessary to verify changes manually. This can be performed by updating the group membership for Continuous Integration Tools group in gerrit.
add an acl file (to the acls/production directory below) by using cookiecutter.config as an example found in the below path (i.e. make a copy):
[forj-config.git] / modules / runtime_project / files / gerrit / acls / templates / cookiecutter.configplace cookiecutter.config in directory (projectname should match the name of the project): (note: change the ‘cookiecutter-core’ to whatever group name you would like to use in your project: example: my-new-proj1-core):
[forj-config.git] / modules / runtime_project / files / gerrit / acls / production / projectname.configto create project edit file:
[forj-config.git] / modules / runtime_project / templates / gerrit / config / production / review.projects.yaml.erbpush changes to your gerrit repo:
$ git add <new-project-acl-file>
$ git add review.projects.yaml.erb
$ git commit -m "my new project"
$ git push
To learn more on how to configure yaml, see jeepb docs.
you can migrate public projects with the upstream option.
Projects that are created in gerrit currently have no approach for deletion, but these can be removed from normal users view through acl changes. For more info, please refer to : rename project or remove project
4.3.2. Adding a new jenkins job and configure Zuul for a given project in gerrit
Zuul configuration consist of 4 basic parts.
update hieradata to include any new templates that will be used for the job in runtime_project/files/hiera/hieradata/Debian/nodetype/ci.yaml
- this is only needed if you need a new compiler option, or new tool that will not exist on the build server.
- configure in the following section ci-node -> class cdk_project::jenkins -> job_builder_configs.
Example:
cdk_project::jenkins::job_builder_configs:
        - 'tutorials.yaml'
        - '<new_job_template_name>.yaml'
configure the new template into runtime_project/templates/jenkins_job_builder/config/
- a pre-existing template file can be used to describe the builders for the job, or a new one can be created
- pre-existing macros can be found in runtime_project/files/jenkins_job_builder/config/macros.yaml
update layout.yaml in runtime_project/files/zuul/config/production/layout.yaml
- the projects section should be updated with the new project and gates, along with jobs that will be executed from projects.yaml, example:
projects:
 - name: tutorials
   check:
     - tutorials-flake8
   gate:
     - tutorials-flake8
   post:
     - puppet-apply-all-nodes
   release:
     - tutorials-flake8
add the project section to runtime_project/files/jenkins_job_builder/config/projects.yaml
- this will define the jobs to be created in jenkins, job names will be mapped to buiders by zuul. The “name” must match the job-template layout file (line 2 in the jenkins_job_builder file), and the “git_project” must match with the name of your project in gerrit.
projects:
   name: tutorials
   git_project: tutorials
   branch: master
   jobs:
    - '{name}-flake8'
    - '{name}-<new_job_name>'
Once this is done, you will need to push the changes to gerrit, verify and submit. Next the eroplus box will need to run puppet cycle, or puppet agent -t to get the new runtime_project udpates. Finally the ci server will need to run a puppet cycle or puppet agent -t so that the job builder can setup the job.
Note
More info on zuul: http://ci.openstack.org/zuul
4.3.3. Remove a project in gerrit
Stop gerrit:
$ sudo service gerrit stopstart the gsql client on local admin bash shell:
$ java -jar /home/gerrit2/review_site/bin/gerrit.war gsql -d /home/gerrit2/review_siteremove entries from table account_project_watches
select * from account_project_watches;
delete from account_project_watches where project_name = 'tutorials-2'
delete changes
select * from changes where dest_project_name = 'tutorials-2';
delete from changes where dest_project_name = 'tutorials-2';
Remove the repo from disk.
$ rm -rf /var/lib/git/tutorials-2.git
$ rm -rf /home/gerrit2/review_site/git/tutorials-2.git/
Note
this should be done on all replicas
Start gerrit back up
$ service gerrit start
4.4. User management
In the Redstone blueprint, the first user who authenticates to Gerrit and Jenkins become administrator. Then, it is the role of the administrator to add users in the respective tools and projects.
4.5. Configure Email Notifications
In order to gerrit send email notifications you need to configure it first.
- First you need to have at least one project configured in gerrit, and have a forj-config clone git repository.
- Have a external MTA account, in this example we will use sendgrid. This service has a free account option if you want to try it.
- In the path forj-config/modules/runtime_project/files/hiera/layouts/ you need to make the following changes in the file maestro.yaml:
classes:
  - ....
  - exim_config

exim_config::smarthost: 'smtp.sendgrid.net'
exim_config::port: '587 byname'
exim_config::smtp_require_auth: true
exim_config::smtp_username: 'YOUR_USER'
exim_config::smtp_password: 'YOUR_PASSWORD'
exim_config::queue_smtp_domains: 'localhost.org'
exim_config::relay_from_hosts:
  - '127.0.0.1'
  - "%{::exim_config::utils::review_ip}"

sysadmin_config::manage_servers::iptables_public_tcp_ports:
  - 25
  - ...
In the same path as above, modify the file review.yaml adding the following lines:
classes:
  - exim_config::utils
  - ...

gerrit_config::smtpserver:      "%{::exim_config::utils::maestro_ip}"
gerrit_config::sendemail_from:  'YOUR_SENDFROM_EMAIL_NAME'
4.6. Email Troubleshooting
If you are having problems with this configuration, you can try these steps to find where the problem is.
- Check if gerrit was configured correctly in Review server:
- Check gerrit’s config file located in /home/gerrit2/review_site/etc/gerrit.config you should have something similar:
[sendemail]
smtpServer = 10.0.0.90
from = robot <robot@my.com>
- A common problem is an empty IP address, just make sure that exim_config::utils in classes is located before gerrit class.
- Check if the port 25 is open on maestro server:
$ nc -v 10.0.0.90 smtp
Connection to 10.0.0.90 25 port [tcp/smtp] succeeded!
220 maestro.v5.dev.forj.io ESMTP Exim 4.76 Fri, 18 Jul 2014 22:00:05 +0000
- Make sure that you have at least 2 users registered in gerrit before attempting to test it.
- While you generate the email event in gerrit, keep monitoring log file: tail -f /home/gerrit2/review_site/logs/error_log, you should see if the mail was attempted to sent.
- Check if exim was correctly configured in maestro.
- Try to send a test email to check if the external smtp server was configured correctly:
$ echo "Test email " | mail -s "test external" <email_address@my.com>
- If you didn’t receive the mail you can test changing the parameters manually in exim config file
$ service exim4 stop
$ vim /etc/exim4/exim4.conf
$ service exim4 start
- As a alternative you can use a terminal email client to make further tests.
$ apt-get install mutt
$ vim ~/.muttrc
and add the following line:
set smtp_url = "smtp://smtp.sendgrid.net:587"try to send a test email
echo "Test email " | mutt -s "test external" email_address@my.com- You can view exim logs in the following location: /var/log/exim4/mainlog
- Allow puppet to run at least twice on both maestro and review nodes in order to see your changes show up.
4.7. Configure DNS Names
Initially when you deploy your forge, you will refrence your forge by ip address but this is not practical for your end-users. It’s possible to assign a well known dns name to your forge nodes from a DNS server outside of your cloud account. This section will only describe the areas of [forj-config] that can be updated to controll the naming behavior for jenkins and gerrit. We will not attempt to describe how to use external DNS service.
The following files will be modified to give a well known domain name for each node. You should register the domains with your DNS provider.
[forj-config]/modules/runtime_project/
Directory file Proposed DNS names ./files/hiera/layouts maestro.yaml maestro.yourdomain.com ./files/hiera/layouts ci.yaml ci.yourdomain.com ./files/hiera/layouts review.yaml review.yourdomain.com ./files/hiera/layouts util.yaml util.yourdomain.com Configuration for maestro node.
[forj-config]/modules/runtime_project/files/hiera/layouts/maestro.yaml
From:
jimador::site:
  maestro_url: "http://%{::maestro::node_vhost_lookup::vname}"
  shortname: "RedStone"
#...
To:
jimador::site:
  maestro_url: "http://maestro.yourdomain.com"
  shortname: "RedStone"
#...
Configuration for ci node.
[forj-config]/modules/runtime_project/files/hiera/layouts/ci.yaml
From:
#Jenkins tool
cdk_project::jenkins::vhost_name:               "%{::maestro::node_vhost_lookup::vname}"
#...
#Zuul tool
cdk_project::zuul::vhost_name:        "%{::maestro::node_vhost_lookup::vname}"
#...
cdk_project::zuul::zuul_url:          "http://%{::maestro::node_vhost_lookup::vname}/p"
#...
To:
#Jenkins tool
cdk_project::jenkins::vhost_name:               "ci.yourdomain.com"
#...
#Zuul tool
cdk_project::zuul::vhost_name:        "ci.yourdomain.com"
#...
cdk_project::zuul::zuul_url:          "http://ci.yourdomain.com/p"
#...
Configuration for review node.
[forj-config]/modules/runtime_project/files/hiera/layouts/review.yaml
From:
#...
cdk_project::gerrit::vhost_name:                       "%{::maestro::node_vhost_lookup::vname}"
cdk_project::gerrit::ip_vhost_name:                    "%{::maestro::node_vhost_lookup::vname}"
cdk_project::gerrit::canonicalweburl:                  "https://%{::maestro::node_vhost_lookup::vname}/"
#...
To:
#...
cdk_project::gerrit::vhost_name:                       "review.yourdomain.com"
cdk_project::gerrit::ip_vhost_name:                    "review.yourdomain.com"
cdk_project::gerrit::canonicalweburl:                  "https://review.yourdomain.com/"
#...
Configuration for util node.
[forj-config]/modules/runtime_project/files/hiera/layouts/util.yaml
From:
#...
cdk_project::status::vhost_name: "%{::maestro::node_vhost_lookup::vname}"
cdk_project::status::graphite_url: "http://%{::maestro::node_vhost_lookup::vname}:8081"
cdk_project::status::static_url: "http://%{::maestro::node_vhost_lookup::vname}:8080"
cdk_project::status::maestro_url: "http://%{::eroip}"

# 'graphite' tool
cdk_project::graphite::vhost_name: "%{::maestro::node_vhost_lookup::vname}"
#...
# 'paste' tool
cdk_project::paste::vhost_name: "%{::maestro::node_vhost_lookup::vname}"
#...
To:
#...
cdk_project::status::vhost_name: "util.yourdomain.com"
cdk_project::status::graphite_url: "http://util.yourdomain.com:8081"
cdk_project::status::static_url: "http://util.yourdomain.com:8080"
cdk_project::status::maestro_url: "http://maestro.yourdomain.com"

# 'graphite' tool
cdk_project::graphite::vhost_name: "util.yourdomain.com"
#...
# 'paste' tool
cdk_project::paste::vhost_name: "util.yourdomain.com"
#...
- Commit and approve these changes.
4.8. Install SSL Certificates
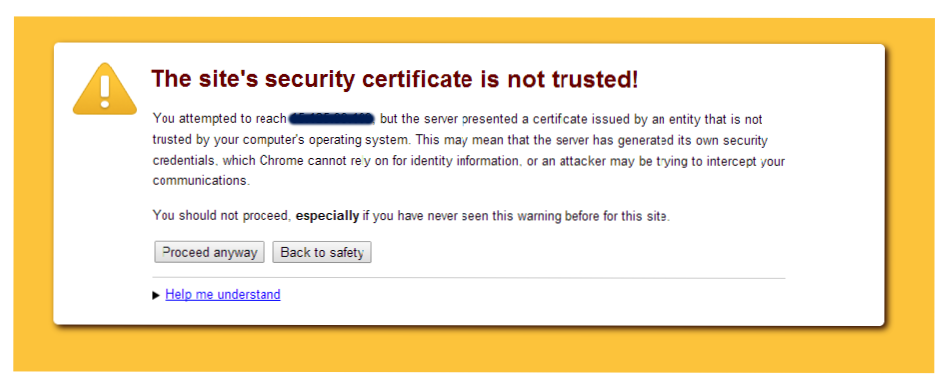
The Redstone blueprint will install a custom certificate that is digitally signed by a self signed certificate registry located on maestro. This is managed by the cacerts puppet module from the forj-oss/maestro repository. This however means that developers and end-users that access the review and ci nodes for your forge will be warned and prompted to continue navigation to the site because these certificates are not typically trusted by the browser.
In this section we will describe the process you can follow for configuring a digitally signed certificate from a certificate authority that would more commonly be trusted by your browser. This would replace the automated self signed certificates that are auto generated by maestro. When making changes to the [forj-config] repository, be aware that the same ci workflow used for updating projects and gates still applies here.
Generate a private key and certificate signing request(csr). This can be performed with these instructions documented on the verisign website.
Example:
$ openssl genrsa -passout pass:secretpass -des3 -out review.yourdomain.com.key 2048
$ openssl req -new -key review.yourdomain.com.key -out review.yourdomain.com.csr
- Submit the .csr request to your certificate authority (verisign for example) and save away your private keys. If you also recieve intermediate certificates, such as a corporate signing authority, you will need to save those as well. These will be your intermediate certificate chain.
- Ideally this request is performed for review and ci nodes. Long term, you will also want one for the maestro node. At this time, we do not need a certificate for the maestro node.
Create a custom_certs module to deliver your certs.
clone the [forj-config] project from your Redstone forge so that we can create a new module to store and deploy the certificates. Even though the private key is protected, it’s possible to store the credentials for the certificate in a secure hiera eyaml file on maestro for decription. In these steps we are only creating the certificates for review node, but you can repeat this for ci and maestro nodes.
Folder layout for custom_certs puppet module:
[forj-config]/modules/custom_certs/
Directory file Description ./files/certs chain.crt This is your certificate signer public certs. ./files/certs review.yourdomain.com.locked_key This is the private key generated in step 1. Password included. ./files/certs review.yourdomain.com.csr Your certificate request ./files/certs review.yourdomain.com.cst Your x509 signed cert from your certificate provider. ./files/manifests review_sslparams.pp This will contain puppet ref vars to ssl cert contents. Create a class file <node>_sslparams.pp for each cert that will be needed. In this case we create the class file for the review node (review_sslparams.pp). We can’t use the normal puppet file function because it will fail on runs where the cert doesn’t exist, but we can use a custom parser function provided by [forj-oss/maestro]::cacerts called cacerts_getkey.
Sample Code to create in forj-config:
[forj-config] / modules / custom_certs / manifest / review_sslparams.pp
class custom_certs::review_sslparams
(
  $ca_certs_db  = hiera('cacerts::ca_certs_db','/opt/config/cacerts'),
)
{
  $ssl_cert_file_contents      = cacerts_getkey( "${ca_certs_db}/custom/review.yourdomain.com.crt" )
  $ssl_key_file_contents       = cacerts_getkey( "${ca_certs_db}/custom/review.yourdomain.com.key" )
  $ssl_chain_file_contents     = cacerts_getkey( "${ca_certs_db}/custom/chain.crt" )
  if $ssl_cert_file_contents != ''
  {
    notify{'custom cert found for ci ssl_cert_file_contents':
      before => Class['cdk_project::gerrit'],  # here we call the class we want to run before.
    }
  } else
  {
    warning('ci ssl_cert_file_contents is empty for custom cert')
  }
}
The default location for certs will be in /opt/config/cacerts for maestro node. Under this folder we will place the custom certs in a custom folder. The notify resource will be used to sequence the cert configuration of the parameters prior to any actions on the classes from gerrit.
Note, the chain.crt is simply the collection of pem files for the certificate signers public keys that are created for the trust authority. You can make this empty if you are using a well known provider that comes installed with the browsers you want to support.
repeat the steps for the ci node, by changing all the review names to ci.
- Note, for the ci node, change :
before => Class[‘cdk_project::gerrit’],
- to
before => Class[‘cdk_project::jenkins’],
Un-comment or add this sections to maestro.yaml in [forj-config]::runtime_project This will place all the files from your custom_certs module into /opt/config/cacerts/custom on the maestro node.
Sample Code to create in forj-config:
[forj-config] / modules / runtime_project / files / hiera / layouts / maestro.yaml
classes:
  - runtime_project::install
  - sysadmin_config::manage_servers
  - cacerts::custom                  # user story #2189: uncomment this to enable custom cert installation

# ...
# 2. uncomment the source module that will hold all custom certs to be unpackaged.
cacerts::custom::source: 'puppet:///modules/custom_certs/certs'
# ...
Setup the master password for certs that were created in step 1 on the maestro box. The password itself will be encrypted on maestro under /etc/puppet/hieradata/common.eyaml with public/private keys found in /etc/puppet/secure Make sure thepassword matches the password you selected in step 1 for secretpass.
ssh to maestro node:
$ sudo -i
$ cd /etc/puppet/secure
$ eyaml encrypt -l 'cacerts::custom::ca_pass' -s 'thepassword' | grep "cacerts::custom::ca_pass: ENC" >> /etc/puppet/hieradata/common.eyaml
Add the following yaml to [forj-config]::runtime_project / files / hiera / layouts / <node>.yaml files. If you are setting up custom certs for review and ci nodes, then you will update the follwing two files:
Directory file /modules/runtime_project/files/hiera/layouts review.yaml /modules/runtime_project/files/hiera/layouts ci.yaml - Add another class to classes: array.
- Set the ssl_*_contents sections to the class param values.
review.yaml contents:
classes:
  - custom_certs::review_sslparams

# ...

# these will be automatically created if we pass them in empty.
cdk_project::gerrit::ssl_cert_file_contents:           "%{::custom_certs::review_sslparams::ssl_cert_file_contents}"
cdk_project::gerrit::ssl_key_file_contents:            "%{::custom_certs::review_sslparams::ssl_key_file_contents}"
cdk_project::gerrit::ssl_chain_file_contents:          "%{::custom_certs::review_sslparams::ssl_chain_file_contents}"

# ...
ci.yaml contents:
classes:
  - custom_certs::ci_sslparams

# ...

# these will be automatically created if we pass them in empty.
cdk_project::jenkins::ssl_cert_file_contents:   "%{::custom_certs::ci_sslparams::ssl_cert_file_contents}"
cdk_project::jenkins::ssl_key_file_contents:    "%{::custom_certs::ci_sslparams::ssl_key_file_contents}"
cdk_project::jenkins::ssl_chain_file_contents:  "%{::custom_certs::ci_sslparams::ssl_chain_file_contents}"

# ...
Execute puppet apply commands as root on maestro, ci, and review nodes in that order. Connect to the maestro node and run these commands:
$ sudo -i
$ puppet agent -t
$ salt -E '(ci|review).*' cmd.run "/usr/bin/puppet agent -t"
If certs don’t imediately install, you can also restart apache services on each node:
$ salt -E '(ci|review).*' cmd.run "service apache2 restart"
4.9. FAQ
... How do I create a new project?
Creating a new project on a redstone forge means creating a new Gerrit repository. We use the CI workflow of the forge itself to manage the project creation process. Configuration files are modified and updated to provide the administrator of the forge an oportunity to review the commit. Currently we do not provide automatic review option, but one could be setup using zuul gate triggers.
... re-trigger the verification for project create change request?
If your forge did not trigger a verification check for the project creation request, it is possible to re-trigger the request on the change request. Go to the change request and add a new comment. Make the comment text say: ‘recheck no bug’. This should trigger a zuul gate check for the change request.
... approve a new project creation request on gerrit?
First you must be the administrator of your forge or contact and the administrator of the forge you will try to access. The approving user must be added to the group, forj-core. This can be done in Gerrit from the Admin->Groups menu by the Gerrit administrator. Once done, the user added can then administer approvals by adding +2 for Code Review and +1 for Approved on the change request.
... change the group that approves changes for forj-config on gerrit?
Approval permissions for groups is managed by the forj-config acl’s file. This can be updated with a change request update to the forj-config source on the file : [forj-config.git]/modules/runtime_project/files/gerrit/acls/production/forj-config.config
Change the group forj-core to a new group name. If the group does not exist a new one will be created.
| [1] | The OpenStack Word Mark and OpenStack Logo are either registered trademarks/service marks or trademarks/service marks of the OpenStack Foundation, in the United States and other countries and are used with the OpenStack Foundation’s permission. We are not affiliated with, endorsed or sponsored by the OpenStack Foundation, or the OpenStack community. |